目次
Raspbianインストール直後の状態
Raspbian Stretch Lite の初期状態では、Pythonの環境として、2.7と、3.5が両方ともインストールされている。’python’には、2.7がリンクされており、3.5を起動するには、’python3’ とシェルから入力する必要がある。(もちろん、スクリプトの先頭に、#!/usr/bin/python3を書いておけば、その面倒は無いが・・)
現時点の、Python最新は 3.6であるが、当面、初期バージョン3.5のままで進める事にする(まだ、Raspberry上のPythonアップグレードの方法がよくわからないから・・・)
パッケージ(ライブラリ)のインストール・アンインストールの基本 (pip vs. apt vs. apt-get)
Pythonの場合、pipで各種ライブラリをインストールしたり、消したり、アップデートしたり、リストを取ったりすることが、これまで自分の常識だったが、Raspberryでやろうとしたら、まずpipが入っていない。
「からあげ」さんの下記サイト情報にもあるが、確かに実際に自分でパッケージをインストールした時もその所要時間の差は大きく感じた。基本的に、Raspberryでは、当面、pipを控えて、apt-get を使うことにする。
と思っていたら、apt-getの他に、raspbianの jessie以降は、aptを使う方法もあるらしい。今回、インストールしたOSは、jessieの次のstretchなので、aptが使える。下記サイトの情報では、apt-getより aptの方がシンプルらしい。初心者の私としては、まずは aptを基本にして、不足がある時に、apt-getを使うことにする。
- Raspberry pi aptコマンドを使おう

- 例えば、pandasをインストールしようとして、sudo apt install python3-pandasを実行したが、エラーで中断した。代わりに apt-getでインストールを試みたら、正常にインストールできた。やはり、aptでのインストールは汎用的とは言えない感じ。
ただし、pipが、pythonのモジュールだけリストするのに対して、apt listコマンドでは、指定をしない限り、システムにインストールされているライブラリが、全部表示される。
-
- インストールされているパッケージを知りたい時には、dpkg –lの方が便利。 ちなみに、下記は現在のraspberry pi zero側の状態だが、いくつかのパッケージをインストールして、またアンインストールしてからの状態なので、まっさらの状態からは変わっていると思われる。
|
1 2 3 4 5 6 7 8 9 10 11 12 13 14 15 16 17 18 19 20 21 22 23 24 25 26 27 28 29 30 31 32 33 34 35 36 37 38 39 40 41 42 43 |
yy@pizw001:~ $ dpkg --get-selections | grep python dh-python install libpython-stdlib:armhf install libpython2.7-minimal:armhf install libpython2.7-stdlib:armhf install libpython3-dev:armhf install libpython3-stdlib:armhf install libpython3.5:armhf install libpython3.5-dev:armhf install libpython3.5-minimal:armhf install libpython3.5-stdlib:armhf install python install python-apt-common install python-minimal install python-pip-whl install python2.7 install python2.7-minimal install python3 install python3-apt install python3-cffi-backend install python3-chardet install python3-crypto install python3-cryptography install python3-dbus install python3-dev install python3-gi install python3-idna install python3-keyring install python3-keyrings.alt install python3-minimal install python3-pkg-resources install python3-pyasn1 install python3-requests install python3-secretstorage install python3-setuptools install python3-six install python3-urllib3 install python3-wheel install python3-xdg install python3.5 install python3.5-dev install python3.5-minimal install yy@pizw001:~ $ |
- これから、いくつかPython3で開発をするために、numpy、pip、pandas、smbusをaptおよび apt-getを使ってインストールした。(pandasは、aptではインストール出来ず、apt-getを使ったらOKだった。理由は不明)。これらをインストール後に、pip3で確認した結果はこちら。色々なライブラリが、関連してインストールされたのがわかる。
- yy@pizw001:~ $ pip3 list DEPRECATION: The default format will switch to columns in the future. You can use –format=(legacy|columns) (or define a format=(legacy|columns) in your pip.conf under the [list] section) to disable this warning. beautifulsoup4 (4.5.3) chardet (2.3.0) cryptography (1.7.1) cycler (0.10.0) decorator (4.0.11) html5lib (0.999999999) idna (2.2) keyring (10.1) keyrings.alt (1.3) lxml (3.7.1) matplotlib (2.0.0) numexpr (2.6.1) numpy (1.12.1) pandas (0.19.2) Pillow (4.0.0) pip (9.0.1) pyasn1 (0.1.9) pycrypto (2.6.1) pygobject (3.22.0) pyparsing (2.1.10) python-apt (1.1.0b5) python-dateutil (2.5.3) pytz (2016.7) pyxdg (0.25) requests (2.12.4) RPi.GPIO (0.6.5) scipy (0.18.1) SecretStorage (2.3.1) setuptools (33.1.1) six (1.10.0) ssh-import-id (5.6) tables (3.3.0) urllib3 (1.19.1) webencodings (0.5) wheel (0.29.0) yy@pizw001:~
1
LEDチカチカ(Lチカ)に必要なライブラリをインストール (python3)
-
- GPIO用のライブラリをインストールする
- sudo apt install python3-rpi.gpio
- 以下のコードを、raspberry上の適当なディレクトリ上に作成する。ここでは、ホームディレクトリに作成しておく。ファイル名は gpio.pyとする。
- cd
- vi gpio.py あるいは、nano gpio.py
- chmod +x gpio.py
- GPIO用のライブラリをインストールする
|
1 2 3 4 5 6 7 8 9 10 11 12 13 14 15 16 17 18 19 20 21 |
[sourcecode language='python' ] #!/usr/bin/python3 import RPi.GPIO as GPIO import time GPIO.setmode(GPIO.BCM) GPIO.setup(24, GPIO.OUT) try: while True: GPIO.output(24, True) time.sleep(0.1) GPIO.output(24, False) time.sleep(0.1) except KeyboardInterrupt: pass GPIO.cleanup() [/sourcecode] |
|
1 2 3 4 5 6 7 8 9 10 11 12 13 14 15 16 17 18 19 20 |
[sourcecode language='python' ] #!/usr/bin/python3 import RPi.GPIO as GPIO import time GPIO.setmode(GPIO.BCM) GPIO.setup(24, GPIO.OUT) try: while True: GPIO.output(24, True) time.sleep(0.1) GPIO.output(24, False) time.sleep(0.1) except KeyboardInterrupt: pass GPIO.cleanup() [/sourcecode] |
-
- LEDを配線する
- コマンドを実行する
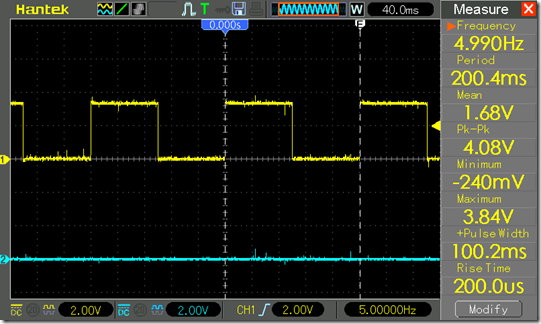
- 試しに、Sleep時間を 0.0005msec (0.5msec)に設定して、スクリプトを起動した所、パルスの周期は、約1.3msec (770Hz) で、50usec程度のジッタが出ている。
- コマンド起動では無く、Raspberry Piがブートした直後から、このプログラムが自動起動するようにしたい場合は、いくつかの方法がある。その中で、最もシンプルなのは、/etc/rc.local の最後(exit 0の前) に、このプログラムを起動するよう記述すれば良い。
- /etc/rc.local の最後の部分。 この例では、yyアカウントのホーム直下のスクリプトを起動している。
|
1 2 |
/usr/bin/python3 /home/yy/gpio.py exit 0 |
この方法の場合、停止させるには、このプロセスを殺すしかない。
-
-
- ps aux
- kill process-id
-
- コマンドラインで起動したものは、Ctrl-Cで終了できる。また、コマンドラインからバックエンドで、このスクリプトを実行することもできる。
-
- ./gpio.py &
-


コメント
[…] 次は、Python3でGPIO制御してみる。 […]